|
| |||||||||||||||||||||||
|
(Truck Bodies) This page assumes you already know the basics. If you do not know the basics, go back to the beginning. This page is designed to show you how to break down a large job into much smaller steps. In this case, we will walk through the steps of constructing a truck for use in MTM/2. But it could just as well be any complex model. The method or "order of operations" is a suggestion only. You may find that you work better using a different formula and/or at a different pace. This page will not give you a vertex and face recipe to build a specific truck (what would be the point?). The thing to remember is that complex models are just a collection of simple models put together in a meaningful way. Let's start with a bumper. Create the faces that will span the front of the truck.
Now, give the bumper some shape.
Next, add the grille.
If you have gotten this far on the first session, you're moving along rapidly. Okay, time for a hood. Can you tell yet this will be a ford?
And now the windshield. It's not time for the sides yet.
The roof should come next. Here's two views of it so you can see things taking shape.
This should be the end of the second or third session. In either case, you will probably want to take a break before attempting this next part. The toughest part about the sides is giving proper shape to the wheel wells. If you don't like what you have, don't be afraid to delete a few faces and verticies and begin again. When you have one side the way you like, use it as the basis for the other side. The vertex locations will be a mirror of the first side. For example, if you are working symmetrically, a -x will become a +x. The second side is always easier than the first.
Now add the rear window. Don't forget, you'll probably want a break someplace around this stage of your progress.
The sides of the box are similar to the sides of the cab, except you don't have the bumper, hood, and roof to line up to. Again, the wheel wells will pose the biggest challenge. Once you have one side done, again use it as the basis for the second side.
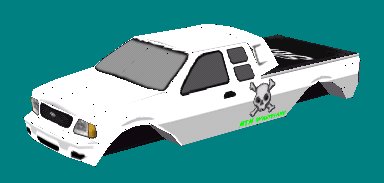
Exactly what you do for this next part will depend on the style and kind of truck you're building. For our purposes, we'll cover the box. However, some people like to leave it open. Either way, here's the cover (though it's hard to see clearly in the picture) of the box.
Finish off the outer body by adding the tail gate. It's starting to look like something now.
Now we turn our attention to the under body. On this truck, there will be three flat sections that make up the floor.
The wheel wells proper take the most patience. But remember, do one side first and then match the other side up with it. You might want to do this in two steps: first the front, then the rear.
For a finishing touch, you can add a roll bar or one of those little flaps behind the cab.
You have your textures ready, right? Good. Nothing left but to map your new truck to the textures.
Almost done. Size and insert a frame, set all face types to shiny, and save. You are now ready to assemble your truck for use in the game. However, editing the *.trk file has nothing to do with BinEdit. I will cover that in another place, and on another day.
|