|
| ||||||||||||
|
(Adding / Changing a Texture) A model is only visible from the side that has a face defined. Without a face, you see right through it like it isn't even there (sorry, but I have no picture of an invisible face). If visibility from both sides is something you want, you have a few options: 1. define a new face for the other side Method 1 - add the second face On a simple model, this would seem to be the easiest, most straightforward way to go.
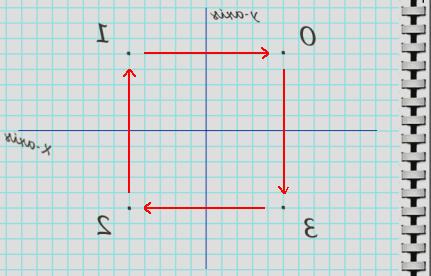
If you recall, our first face used a vertex order of 0,1,2,3 to define the face. That was the clockwise order of the verticies and it created the face on one side of the model. Logically, then, reversing the order 3,2,1,0 would create the face on the other side. That order would seem to be counterclockwise from the side we have been working on. However, if you envision the model from the other side, you see that it is in fact clockwise (on that side). For example, like this:
My apologies for the crude backward graphic, but I want you to see exactly what we're dealing with. It is the same model, with the same verticies, but viewed from the opposite direction.
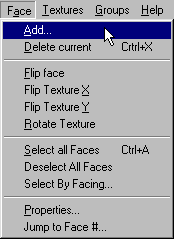
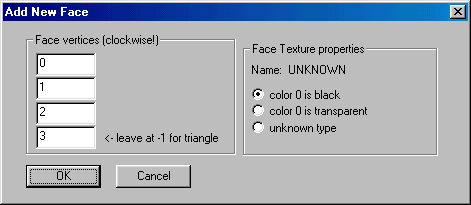
Special note. If you want the texture to be applied in an upright direction, you should begin the face definition in the upper left corner. In this case, that means 1,0,3,2. If the texture orientation does not matter, or you plan to remap later anyway, then this doesn't really matter. But for this page, we will use the 1,0,3,2 order. Goto the Face menu, and click add:
Up comes the Add New Face box. Enter the vertex points for this face, set the type, and click okay.
Your model now has two faces - one on each side. Save your work. Method 2 - flip and repeat same face This is by far my favorite way to create a double sided model. It involves less calculating, less "envisioning," and will match up on both sides perfectly. The principle underlying the "flip and repeat" idea is based on the fact that you already know what you just created. In our case it was a face that uses verticies 0,1,2,3. After we flip the face, there will be nothing on this side again. Just like starting over. So, we create it again. Let's demonstrate. Press the space bar so that the face is highlighted (purple):
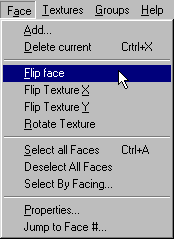
Now, from the Face menu, select "Flip face".
Your model will seem to disappear. It hasn't, but it will seem that way. Use the cursor keys to spin the model around, and you will see the face is still there, but on the other side. Now, goto Face>Add.
Up comes the Add New Face box. Repeat the same steps we used to create the first face. Use the same vertex points in the same order. Set the face type and click OK.
Your model now has two faces - one on each side. Save your work. This method really simplifies matters when you're working on a model that has hundreds of verticies and faces. Just try envisioning the reverse of a face that uses verticies 250,99,202,54 so that the texture will be oriented in an upright direction. Also, for objects like trees or anything else that you can drive around in the game (Burn's spectators?), this method will ensure that the branches and leaves match from one side to the other. Method 3 - flip and insert This method is even easier still. After you have created the model and have added the first face, save it. Now do the same thing as above. Highlight the face (purple), goto Face>Flip face and, um, well, flip it. Do not define a new face. Goto File>Insert.
This will open a standard windows box. Browse to the model you just saved - the same one you are working on and is still open in BinEdit - and click open. Your model now has two faces - one on each side. Save your work. The drawback to this method - yeah, there had to be one - is that you double your vertex count (a source of lag and errors). In this example, you go from a model with four verticies (that you defined) to a model with eight verticies (four on the open model plus four on the inserted model). Of course, eight might not seem like much, and it isn't, but this is only one model with only two faces. This increase becomes a huge problem on more complex models. You could easily go from 200 verticies to 400 verticies. If you use many models like that in your track, you soon start pushing the limit on the Too Many Verticies error.
A final note. Does all this sound too complicated? Don't worry, it's not. Once you get the knack of this stuff, you will be able to create our little sample zep wall in about sixty seconds. No fooling. |