Painting, PSP Basics
Building Trucks
(Painting 1 - PSP Basics)
~ by Alpine ~
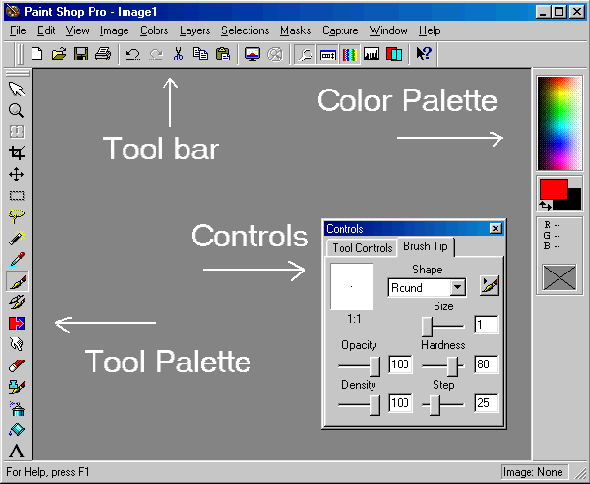
The Paint Shop Pro Window
The Tool bar, Tool palette and the Color palette can be floating or
docked at the side of the window (shown here).
Each Tool Palette button has its own corresponding set of controls.
Tools and Buttons
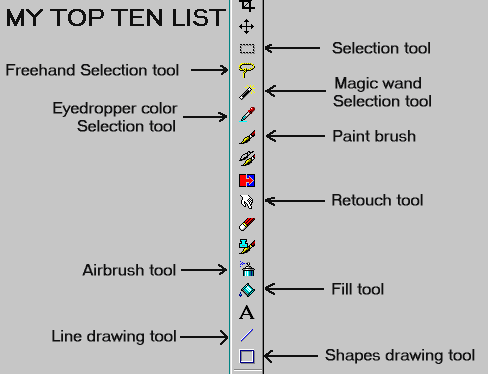
First of all - lets look at the tool palette to familiarize yourself
with the buttons. Here is a good look at the floating tool palette.
My Top Ten List shows the buttons I use the most.
I'll be showing many good tricks to help you make quick work out of
most of your painting tasks.
| 1. Selection Tool
With this, you drag to select sections of your image for copying, or
for setting boundaries.
* Tip: You can hold SHIFT to add another section to your selection,
or CONTROL to remove a section! Try it!
|
| 2. Freehand Selection Tool
With this, you can make complex selections faster.
* Tip: Click to use this tool, then open the Controls Palette. You can
set this tool to function much easier by using 'Point to point' mode. Now
u can click on the image, then click where you want the next point to be,
and continue around the section you need selected. Much better than trying
to trace the edges with the mouse! Try it!
|
| 3. Magic Wand Tool
With this, you can select everything of a specific color with the click
of a mouse button! Use the Controls Palette and set the Tolerance higher
to allow slightly different colors to be included.
* Tip: Hold SHIFT and click again to gather up those last stray pixels
that just didn't make it. It's easier that trying a higher tolerance level
to include a specific color! Try it !
|
| 4. Eyedropper Tool
With this - you select a color that exsists already in the image.
* Tip: Hold CONTROL while painting or applying text for a temporary
switch to the eyedropper. You won't have to click on the button and then
click back to your paint tool! Try it!
|
| 5. Paint Brushes
This is used to apply color to an image ( of course ).
* Tip: Click for the Controls Palette and experiement using different
paper textures. You get some pretty cool effects ! Try it!
|
| 6. Retouch Tool
This is for applying variations to the exsisting image. You must have
your Controls Palette open because the variations... um... vary... um...
very severyly... Oops. SeVERely. My favorite modes are Lighten, Darken,
Soften, and Push.
* Tip: Smooth out those rough edgy videogame graphics on the backdrop
mountains by using Soften! Just drag the cursor along that edge to blend
the edges right out! Try it! (Some graphics cards blur the edges nicely,
while others do not.)
|
| 7. Airbrush Tool
This is for applying color in such a way that it blends better than
with the paintbrush. You can alter the intensity using the Controls palette,
just as you can with the paintbrushes.
* Tip: With a little practice, you can use this tool to help you with
fades. It works a lot better than using a Gradient Fill! Try it!
|
| 8. Fill Tool
This is for applying color, or an image to an entire area at once. Use
the Controls Palette to change Tolerance to maximize coverage or change
Opacity settings to control transparency.
* Tip: You can use an image to fill an area ( yes this IS an old tip)
by selecting PATTERN from the Fill Style on the Controls Palette. Make
sure you have the image you want to use open, and select it by clicking
the Options button. Try it !
|
| 9. Line Drawing Tool
This is used to make accurate lines on an image. This is one of my favorite
tools for painting because you can get into very tight spots!
* Tip: Hold SHIFT before clicking to draw a line and PSP5 will limit
your angles to incriments of 45 degrees! It's great for quickly painting
horizontal or vertical lines without worry of being offset by 1 pixel.
Try it!
|
| 10. Shapes Drawing Tool.
This is for drawing filled or outlined shapes on an image. It's pretty
useless except for filling in large areas with color. I find its biggest
use is to quickly cover screw-ups :o)
|
|