Lesson B - Painting the terrain - textures.
To work with textures (square images that define what the terrain looks like)
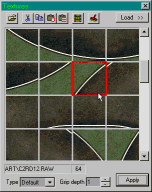
we need the TexturesBox - this is activated by selecting View/Textures from the main menu.
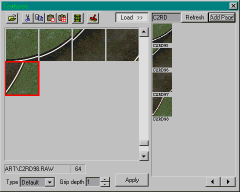
5 Load base texture. Click the [Load >>] button in the
TexturesBox and you should see a bunch of textures that look like bits of the Crazy 98 terrain.

The first one we load will autmatically be placed across the whole terrain,
so lets load a grass texture first - type "CR4GR" in the small text box above
the display of textures then click the "Refresh" button next to it.
(This acts as a "filter", and will only display those textures whose name
matches what's in the box). You should see just one grass texture now - double
click it and it will be loaded into the area on the left of the TexturesBox
(which means its now loaded into our track). You should also see that the purple
has been replaced by this texture on the main display.
6 Load some road textures. Now type "C2RD" in the filter box and click "Refresh" -
you should see a whole bunch of textures with pieces of road surface. Click the
"Load Page" button and they should all be transferred to the left side display.
Click the > button (bottom right of TexturesBox) to show the next page of textures
and "Load Page" again... repeat 2 more times, until all of them are loaded
(the last page should show ony 4 textures).
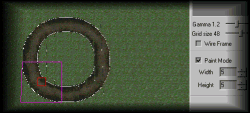
7 Paint some road. You can now close the [Load >>] section of the TexturesBox by
clicking the button again, and you may want to move the TexturesBox to the side
(but dont close it just yet).
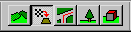
Click the "Edit Textures" button in the toolbar (second button in the group below the Help menu option).
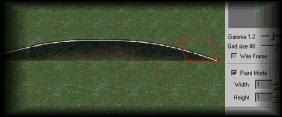
On the right, you should now see a small panel with a "Paint Mode" button - click
that button, and then change the "Width" and "Height" numbers to 1 (one).
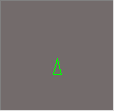
Make sure you're facing "North" - use left/right arrow keys if necessary until the
green arrow on the map is pointing upward.
Use "PgDn" to tilt the display downward (until the horizon just disappears),
then in the Textures Box scroll up to the top and click on the second texture
so its outlined in red (should be named C2RD02).
Move the mouse over the main display, and click on a square to "paint" this texture.
Then select the next texture in the TexturesBox and then click in the adjacent
square to where you put the last one. Repeat 5 more times and you should see the
makings of a road.
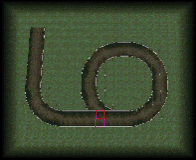
8 Build an oval. The textures are generally listed in blocks that go together
in the TexturesBox, so you can mostly paint them in in strips. However, you will
notice the strips might be out of order, so you will need to scroll through the
TexturesBox to find the next strip. The second strip begins with texture C2RD12.RAW
There are also some "missing" textures for a full Crazy98 oval - you will need
to repeat the straight segments from the left side to the right and also from
the top to the bottom to complete the oval.
This process can be a pain, but dont worry - you wont have to do this every time
(texture "patterns" can be saved for later re-use - and even copied directly from
existing tracks - using View/Patterns. See Help for more details on that).
9 Copy another corner. We will now use the small oval we just built to assemble a larger one.
You'll need to use the "A" key to zoom up and away - this will increase the size
of the area you can see, which will be helpful for building our larger circuit.
Zoom up as far as it will go, and use "PgDn" again so that the small oval is
somewhere around the center of the display.
Set the paint mode "Width" and "Height" both to 5 - and you move the mouse you should
now see a purple box that coers a 5x5 area. Locate this box over the bottom left
corner of our oval, then right-click the mouse and select "Copy Area" from the popup menu.
Now move the purple box to the left of the oval, taking care to keep it in line with the
base of the existing oval (so we can join them up later) , then right-click and select
"Paste Area" from the popup menu. Dont worry if you paste it incorrectly - you can use
Undo (also, clicking the Wireframe button twice to add white grid lines can help).
10 Build straights. Now set the paint mode "Width" to 2 and "Height" to 1, then go to the
middle of the left edge of the oval and copy the straight section (just like you did with
the corner). Paste this repeatedly coming up from the corner you just pasted (to make
this quicker, do 4 then set the "Height" to 4 and then copy and paste those four all in one go).
Set Width = 1 and Height = 2 and copy the straight segment from the bottom or top of the oval,
then paste repeatedly to join the oval to our new corner.
11 Complete the circuit. Repeat the copy/paste process with "Width"/"Height" = 5 for the
top-left corner so that it is connected to the vertical straight section. Then again with
the top-right corner. You can now set Width/Height both to 2 to quickly copy/paste straight
segments to join up the corners.
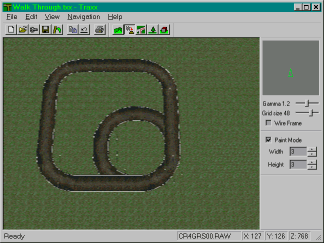
12 Erase unwanted texturing. The inner part of the original oval is no longer needed,
so we should turn it back into grass. The easiest way to do this is to set Width and Height to 3,
then select our base grass texture (first one shown in the TexturesBox) - you can now just click
to paint that texture over the unwanted road areas (remember, Undo works if you paint over
something you didnt mean to).
13 Save your work! Now is probably a good time to save your track - click the "Save" button
in the toolbar, or File/Save from the main menu and enter a name for the file.
This name does not have to be the name of the track - you can call the file whatever you want (eg "Test").
14 Setting texture properties. In the TexturesBox, you will see panels for "Type" and
"Grip Depth" - each texture has its own settings for these (by default, they are all set to "Default", 1).
These settings change the way the trucks handle and skidding noises, dirt kick-up etc
and therefore need to be set properly.
Click to select our first (grass) texture (CR4GRS00.RAW). Set the "Type" to "Grass" and the
"Grip depth" to 3. For all the others that are more than 50% grassy, setthe type to "Grass"
and "Grip depth" to 2. For all the others, which will be 50% or more pavement, set them to
"Cement" and leave the grip-depth at 1.
Prev Lesson Next Lesson
Back to Traxx School
Back to Traxx Home Page
The small print
All Software referenced by this site is Copyright by SoftParts and cannot be sold or distributed in any
way other than by SoftParts.
SoftParts accepts no responsibility for any loss, damage or injury incurred as a result of the use of this
software (not that thats going to happen, mind you....)