One reason you might want to modify a texture will probably be to smooth
out places where two different textures meet, like where you have made
an unusual intersection of a dirt road and an asphalt road and the normal
pieces just don’t seem to want to fit quite right. With all your other
textures in place, there may be just a few spots that need tweaking. When
you paste part of one texture into another one, it is added in a separate
layer. You can see the current layer in the Layers Palette. When you are
cutting and pasting pieces together, having separate layers is convenient,
but when you are ready to draw or apply filters, you need to flatten the
image first to combine all those layers.
Now you’re ready to do some editing. Time to jump into an example. In
this example, you need to use a few tools that are sitting in your toolbox.
| 1. |
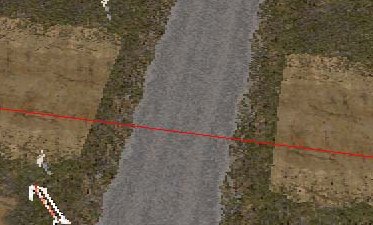
The intersection doesn't look quite finished, I couldn't find
the texture I needed to tie together the 3 different road, asphalt, and
grass textures.
|
|
|
|
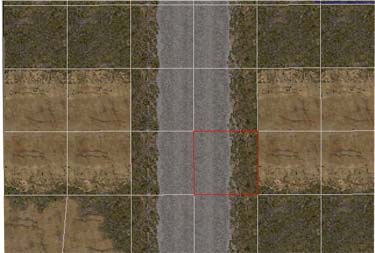
Looking at the intersection with the grid applied, it's easy to see
the textures that need tweaking.
|
|
|
| 2. |
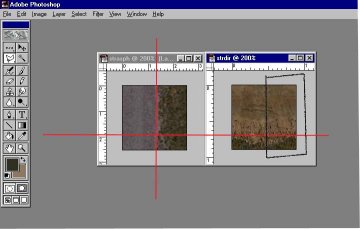
Load the edge of your asphalt road, and the segment of dirt road into
Photoshop and convert to RGB mode. (I make a duplicate of any
texture I’m working on, then close the original without saving any changes
so I know I won’t make any un-reversable mistakes, then do all editing
on just the duplicate files. From the menu, select Image > Duplicate.)
Resize the frames and zoom in a little to make them comfortable to work
on. It's best to have the frames a little bigger than the images
themselves, if you run over a little while cutting and pasting, the excess
is just clipped off.
|
|
|
| 3. |
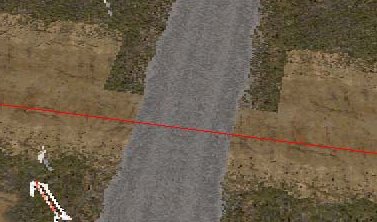
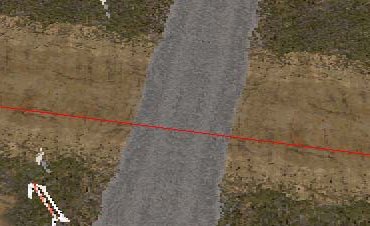
When you combine the two textures, you want to maintain the
grass edge alignments of both the original textures so you can reuse your
new texture in other places where these roads meet. The red lines
show the edges you want to maintain.
|
| 4. |
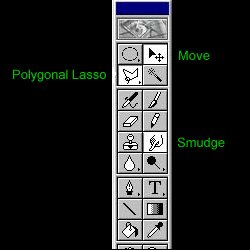
To select the area you want to copy, use your polygonal
lasso tool (the lasso with the straight edges) to select the black
boxed area. Its ok to go outside the picture, the tool will only
grab the image itself.
|
| 5. |
After selecting with the lasso, you will see a blinking line where
your selection is, if you screw up the selection, just start over with
lasso.
|
| 6. |
When you have about half the image selected, from the menu select Image
> Copy (Ctrl+C).
|
| 7. |
Next select the other image. From the menu select Image
> Paste (Ctrl+V).
|
| 8. |
A floating image of the dirt road then appears in the asphalt road
image. The floating image is contained in a new, separate layer.
Select the Move Tool (the little arrow in
the top right of the tool box) and slide the floating dirt road image into
place, maintaing the edges of both images.
|
|

|
| 9. |
The area in the red box is the most critical alignment area.
Can you see how there is grass all in that corner? This way you know
an asphalt/grass, dirt/grass, or just plain grass texture can fit up against
there ok. Next, to flatten the texture, from the menu, select Layer
> Flatten Image. Then use the Smudge
tool (the pointing finger in the tool box) to kind of soften the
lines between the textures you've pasted.
|
| 10. |
This single new texture can be mirrored and turned to fill in the gaps
in all four places.
|
|
|
|
|
| 11. |
In more general terms, anytime you are making two or more textures
meet, you want to work it out so the smudgy lines between them meet at
about half way along the edge of the texture image, that way when you lay
different textures beside each other that smudgy line meets up with the
other smudgy lines. The most basic thing is to split the texture in half
then smudging the line between dirt and grass. Or you might need to make
some diagonal tiles if your road runs off at a 45 degree angle.
|
|

|
| 12. |
When you are done tweaking, you are ready to Save you new texture so you can try it out. |